How to install PostgreSQL with basic queries
INTRODUCTION
The practical wordbook for “DataBase System. In this section we will discuss about PostgreSQL environment and there functionalities, & how to install the PostgreSQL application(DBMS) with lab task.
Index:
In this we learn
Introduction to PostgreSQL.
How to install PostgreSQL.
How to connect with server.
How to create a Database.
How to create Table in PostgreSQL.
How to insert Data (info).
Objectives:
Task #1
Introduction to PostgreSQL & his Installation.
Introduction To PostgreSQL:

PostgreSQL is called Postgres , it was create by Computer Science Professor named Micheal Stonebreker at UCB. It is open source Data Base Management system (DBMS).
Task #2
⦁Installation of PostgreSQL:
How to install PosgtreSQL, First of all you have need backup of PostgreSQL. It is have many versions on internet.

Step No.1
Of Installation of
PostgreSQL is (Double Click) on the
Backup file or setup.
Step No.2

Step No.3
It introduce the
setup and get answer for going to continue the application installing.

Step No.3
In step number
three is specify the Directory (location or place), where you can install this,
it means in which memory partition you can install it.

Step No.4
It confirm the
components, which components you have need in your application.

Step No.5
After selection of components it get password from you for connect the database with server.

Step No.6
It get selection of port number the server it is by default number.

Step No.7
After the
selection of port number server it have some Advance option to locate to use
new database cluster.

Step No.8
In the step 8 it
show some summary to you about the Directory, server install directory, data
base ports, database super user etc. For the confirmation of the application
for your information. It show the
database is there go to install and your database port is this and super user
mean application name and version etc.

Step No.9
After the summary
the application was ready to install, it get permission to install the
application.

Step No.10
After the gating
permission it was save files into memory or (install) the application.


Step No.11
After the
installation it show one message in this message the system say your
application was in process of completing.

Step No.12
After the
finishing the process it tell you to install Stak Builder you do not install it
or (cancel it).

Step No.13
After the finishing of installation, opening (starting) the application look it like this.


Task
#3
Ø Connect to server:
After the opening of PostgreSQL we will connect data base to server. First of all you click on server and then Right click on PostgreSQL and click on (connect server) option.

After the click on
(connect server) it get Password which
password you insert in the process of installation.

After the enter
password you are connect with
server. It remove the (X sign) automatically because you are connected with
server.
Task
#4
Ø Create DataBase:
After the connected with server you are able to create your own DataBase. Click Right on the postgress & goto Query Tool.

And write code on
Query Tool for creating DataBase.

After writing the
code of creating DataBase, select all and Execute the program. Then you have to
refresh the database, after refreshing your Database was created. Then you have to create Table.
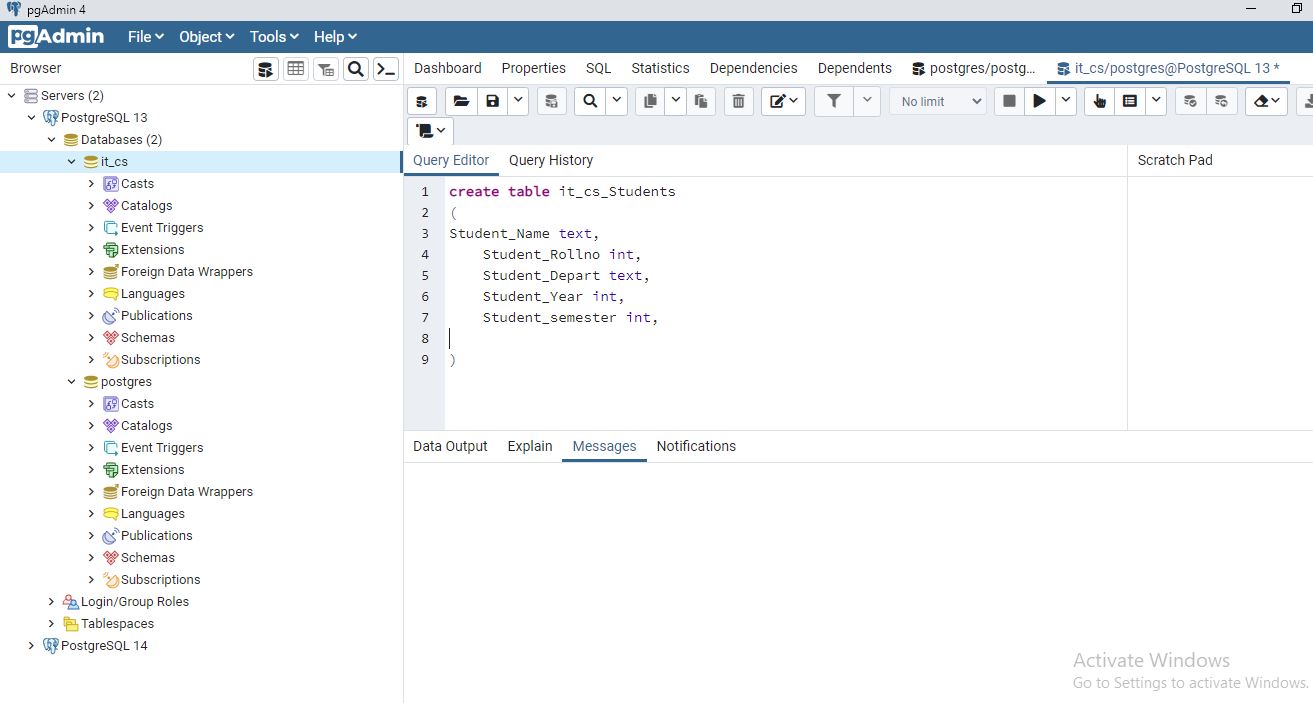
Task
#5
Ø Creating Table

Task # 6
Ø Inserting Data:
In this section we are insert data (info) in
our Table.
It have a Query to insert Data.

______________________The End____________________


Post a Comment